Excel's Hidden Power: The Camera Tool!
- The Excellerator

- Jan 11, 2024
- 4 min read
Updated: Jul 25, 2024
We take a deep dive into one of Excel's most innovative yet under-utilised features: the Camera Tool.
Our comprehensive guide will walk you through the intricacies of using the Camera Tool, showcasing its potential to transform the way you interact with data in Excel.
Whether you are a seasoned Excel user or just getting started, this exploration will expand your toolkit and enhance your data presentation skills.
Far from being a commonly used feature, the Excel Camera Tool is a powerful function hidden within the depths of Excel's interface.
You'd be forgiven if you thought it was just another screen capture app.
(approx. 2 minutes)
Its primary purpose is to create live, updateable images of data ranges or charts within Excel, turning static data into dynamic visual elements.

Here's a step-by-step guide on how to find and activate the Camera Tool in Microsoft Excel:
Open Excel and Select a Workbook:
Start by opening Microsoft Excel.
Choose an existing workbook or create a new one.
Access Excel Options:
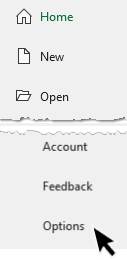
Click on the 'File' tab in the upper left corner of Excel.
In the File menu, select 'Options' to open the Excel Options dialog box.
Customize the Quick Access Toolbar:
In the Excel Options dialog box, select 'Quick Access Toolbar' from the list on the left.
This opens a screen where you can customise the tools that appear in your Quick Access Toolbar, which is located above or below the Excel ribbon.
A. Choose Commands:
On the right side of the dialog box, you'll see a dropdown menu labelled 'Choose commands from'.
Click on this dropdown and select 'All Commands'. This action displays a list of all Excel commands in alphabetical order.
Locate the Camera Tool:
Scroll through the list of commands until you find the 'Camera' tool.
Add the Camera Tool to the Quick Access Toolbar:
Click on 'Camera' to highlight it.
Then, click the 'Add >>' button in the middle of the dialog box to add the Camera Tool to the list of commands in the Quick Access Toolbar.
Confirm and Close:
After adding the Camera Tool, click 'OK' at the bottom of the Excel Options dialog box to confirm your changes.
The Camera Tool icon (which looks like a small camera) should now appear in your Quick Access Toolbar.
Camera Tool Basics: Capturing and Creating Live Images
Using the Camera Tool:
To use the Camera Tool, first select the range of cells, chart, or object in Excel that you want to capture.
Click the Camera Tool icon in the Quick Access Toolbar. Your cursor will change to a crosshair.
Click or click-and-drag in the area where you want to insert the image in your workbook. A live image of your selected range will be inserted.
The Camera Tool operates by capturing selected data ranges and creating images that maintain a live link to the original data. This functionality allows for real-time updates, ensuring your data visuals are always current.
Elevating Your Data Game: Advanced Uses of the Camera Tool
The Power of Live Images in Excel
These live images can be moved, resized, and formatted within your Excel workbook, maintaining their dynamic connection to the source data.
This feature is what sets the Camera Tool apart, providing a level of flexibility and dynamism not seen in standard Excel functions.
Creating Interactive Dashboards
One of the most powerful applications of the Camera Tool is in the creation of dynamic, interactive dashboards. These dashboards, which can incorporate various data snapshots, offer an at-a-glance view of key metrics and data points, enabling quick and informed decision-making.
Visual Storytelling with Enhanced Data Visualization
Beyond traditional data presentation, the Camera Tool allows for enhanced data visualization. It empowers you to present complex data sets in a visually engaging format, making it easier for your audience to digest and understand the information.
Beyond Excel: Integrating Camera Tool with Other Applications

Seamless Integration with PowerPoint
The Camera Tool's integration with PowerPoint is a standout feature. It ensures that your presentations are not only visually appealing but also contain up-to-date data directly linked to your Excel sources.

Expanding Its Reach to Word and Outlook
Moreover, the versatility of the Camera Tool extends to embedding snapshots in Word documents and Outlook emails. This capability enhances the consistency and accuracy of your documentation and communications across the Microsoft Office suite.
Camera Tool in Action: Real-World Applications

Transforming Business Analysis and Reporting
In the business realm, the Camera Tool is invaluable for creating dynamic reports and analyses. It provides a modern approach to visualizing financial and operational data, ensuring your reports are both current and visually compelling.
Revolutionizing Educational Material Creation
In education, the Camera Tool can be a game-changer. Educators can use it to create interactive and engaging teaching materials, simplifying complex concepts through visual aids and enhancing the learning experience.
Overcoming Challenges: Troubleshooting Common Camera Tool Issues
Ensuring High-Quality Images

Occasionally, users might encounter issues with image quality, especially when dealing with scaling. Understanding how to adjust Excel's rendering settings is key to maintaining the visual integrity of your data.

Fixing Linking Errors
Linking errors between the snapshot and the source data can arise. Being equipped with knowledge of Excel's linking mechanisms and troubleshooting methods is essential to ensure the accuracy and reliability of your snapshots.
Expert Tips: Best Practices for Using the Camera Tool
Strategies for Efficient Use
To truly master the Camera Tool, consider strategic placement, sizing of snapshots, and understanding its dynamic linking capabilities. This approach ensures that the tool is used effectively and efficiently in various data-related scenarios.
Exploring New Frontiers: Unconventional Uses
Venturing into unconventional applications opens up innovative possibilities, such as integrating dynamic data visuals into custom applications or online platforms. This exploration pushes the boundaries of traditional Excel use, demonstrating the Camera Tool's versatility and power.


Guys, what program did you use to record the screen for this video? In one of your articles you wrote about Excel Shoot, but I don't know how to use it. Now I'm thinking about Screen Capture or Fraps.
What do you think about it?
Love it!